How-to
I want to
Quick Start
Access
- Access the I-lab Portal
- Create a network-share for the I-lab storage
- Access the I-lab via a third-party WebDav-client, e.g. CyberDuck
User management
- Create a usergroup
- Add/remove users to a usergroup
- Add a non-UU employee to a usergroup
- Add/revoke access rights for group-members
Handling Files and Folders
- Add/Remove a file/folder to a usergroup
- (Un)protect a folder and its sub-folders from overwriting
- Set-up a local synchronized folder on my PC/Laptop with CyberDuck
- Archive a folder and its contents as a dataset
Describe my Data
Starting with the I-lab
To be able to work with the I-lab you’ll have to arrange a few things:
- Register for the I-lab – you can do so by requesting a registration with the I-lab datamanager via mail. You will be registered with username = your UU mail-account and password = your Solis_id password.
- (Optional) After registration, you’ll automatically have one usergroup of which you will be the manager. If you want to create more usergroups, you can do so via the Groupmanager in the I-Lab Portal.
- (Optional) Add other users to your usergroup and set their rights.
- Create a network-share in your local file-manager or a third party application in order to access your files and folders in the I-lab Research Space.
Once you have an user account and access to the I-lab you’re ready to add data to the I-Lab.
How to Access The I-lab Portal
To access the I-lab Portal, navigate to https://i-lab.yoda.uu.nl.
You will be prompted for your username (= your UU mail-account) and password (= your regular Solis password). Only when you manage user-groups or are member of any groups in the system, will you get access. If you don’t have access but would like to start a user-group, please contact the I-Lab Datamanager.
In the I-Lab Portal you can:
- Manage your user-groups and access-rights
- Protect a folder and its contents for overwriting/deletion
- Add metadata to your data (planned for release in June 2017)
- Restore older revisions of a file (planned for release in June 2017)
- Create a datapackage and archive it (planned for release in June 2017)
How to Create a network-share for the I-lab storage
There are several ways to get access to the files and folders of your usergroups. The easiest is by setting up a network share. You can do this in your file-manager, eg. Windows Explorer on a windows machine and the Finder in an Apple. The web address you need to connect to is https://i-lab.data.uu.nl.
For the following example, we’ve used the Windows Explorer.
- Open the Windows Explorer, choose menu-item Tools -> Map network drive
- Click the link Connect to a Web site that you can use to store your documents and pictures at the bottom of the dialog.
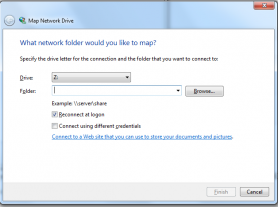
- Start the wizard by clicking next and type in the box where you are requested for the address for the website, FTP-site, or network location: https://i-lab.data.uu.nl.
- Think up the name which you want the drive to have in your Windows Explorer, e.g. I-Lab.
You will be prompted for your username (= your UU-mail adress) and password (= your solis-password) and a network-share will be created, showing all the usergroups you have access to.
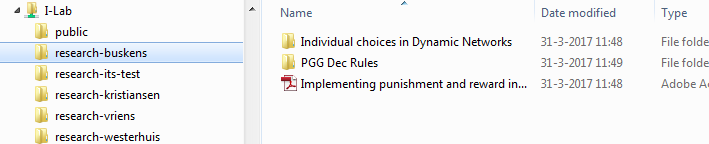
Depending on your rights within a usergroup you can add/rename/move/delete files and folders.
How to mount the I-Lab as a Network Drive
By mounting the I-lab (or one of its folders) link as a network drive, you can create a directory path which you can use in scripts e.g. in Stata or R.
The procedure is almost identical to creating a Network folder (see previous section).
For the following example, we’ve used the Windows Explorer.
- Open the Windows Explorer, choose menu-item Tools -> Map network drive
If you use third party products like NetDrive or CyberDuck to mount the I-lab as a networkdrive, the mounted drive will also be known in your local machine and thus be available for scripts like e.g. R do-files.
- Choose a drive letter, e.g. Z:
- Fill out the connect string: https://i-lab.data.uu.nl.
- Click Finnish
How to Access the I-lab via a third-party WebDav-client
The I-Lab Research Area Data Storage can be accessed via a third-party products as well, e.g. CyberDuck, which we’ll use in this example. You can use these third party products when you for example want to have access to your data via a tablet.
- Download and install CyberDuck.
- Start CyberDuck
- Choose Open Connection in the menu ribbon, or File -> Open Connection
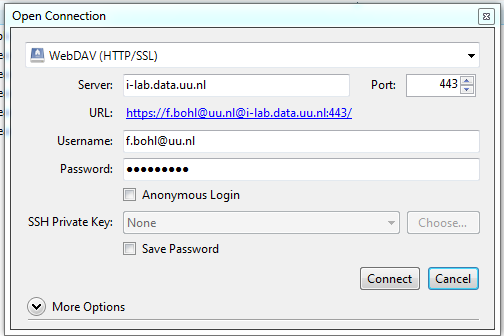
- Choose from the drop-down list the secure WebDAV protocol, i.e. WebDAV (HTTP/SSL)
- Fill out the connect string for the server (i-lab.data.uu.nl)
- Fill out your username (= uu mail address) and password (= UU solis password)
How to Create a Usergroup
To start usergroups, you must be registered as a usergroup-manager for the I-lab. You do so by contacting the datamanager of the I-Lab per mail.
Once you’re registered you can create your own usergroups. You create a usergroup in the Group Manager of the I-Lab Portal by:
- Navigate to the I-Lab portal and log on.
- In the top-menu, select Group Manager
- In the left pane of the Group Manager, titled Yoda Groups, select the I-Lab and press Add Group.
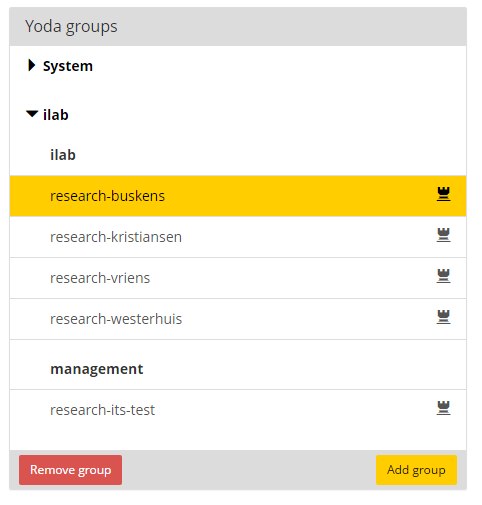
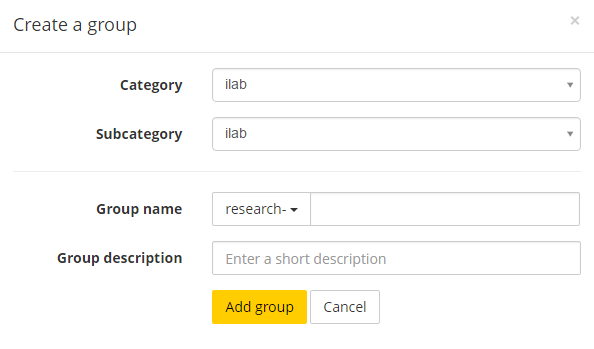
- A dialog starts to help you through the procedure:
- Both the category and sub-category should be “ilab” ( in small small caps)
- Please note that only names in small caps are allowed. You can freely choose the name for the group, which will automatically be pre-fixed by research. The reason for this prefix is so that you can distinguish usergroups in the Research Area from the Datapackages in the vault, which functionality is to be expected for release 2 in June 2017.
How to add/remove users to a usergroup
You can only add users to a usergroup if you have management-rights for that group.
To add/remove a user:
- Navigate to the I-Lab Portal and log on.
- In the home page, choose Group Manager in the top menu
- In the right side of the screen, select the group you want to add or remove users
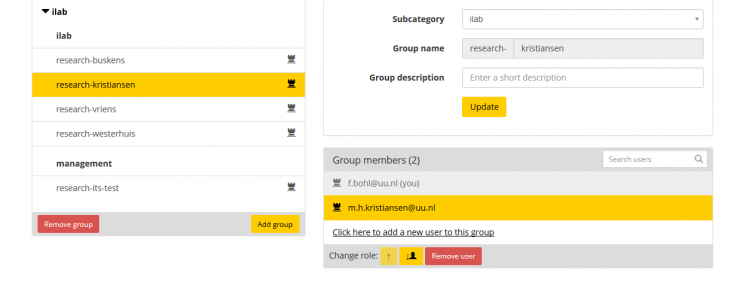
- To add a user: click on Click here to add a new user to this group
- Fill out the UU mail address of the user you want to add and press add user. N.B. the address must be entirely in lower case.
- To remove a user: select the user you want to remove and click the button [Remove User]
Add a non-UU employee to a usergroup
In the current version only persons with a UU mail account can get access to the I-Lab. To grant access to non-UU employee’s, please request for a mail address first for this person. You can do so via the I-Lab datamanager.
Add/revoke access rights for group-members
Within a group a user can have either one of the following rights
- Read – represented by an icon depicting an eye
- Read/write – represented by an icon depicting a persons head
- Manage – represented by an icon a medieval tower
To change the right’s of user:
- Navigate to the I-Lab Portal and log on.
- In the home page, choose Group Manager in the top menu
- In the right side of the screen, select the group you want to change user rights for
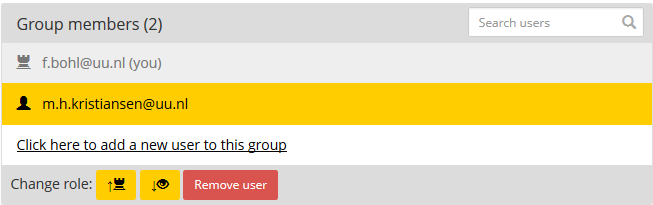
- Select the user and press one of the buttons next to Change Role. The right button will grant more encompassing rights, the left button will downgrade rights.
Add/Remove a file/folder to a usergroup
Files and folders can be added, renamed and (re)moved just like you would do on your regular PC or laptop,
(Un)protect a folder and its sub-folders from overwriting
If you want to protect a folder and all its content (including all its subfolders), from overwriting, but not yet want to sent it of to the archive, you can do so in the I-Lab Portal.
- Navigate to the portal, log on and click on Research in the top-menu.
- Navigate to the folder you want to protect.
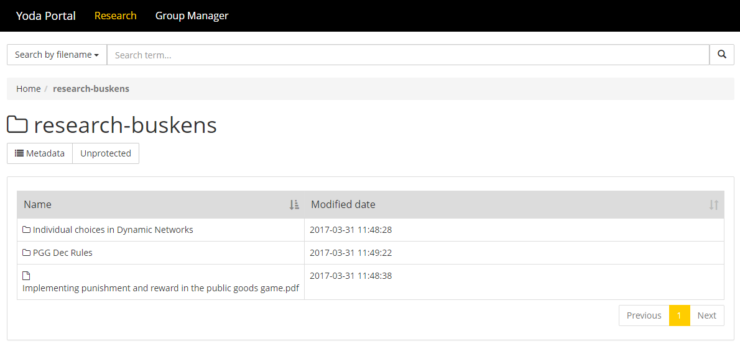
- Press the button Unprotected – once the folder and all its contents will be protected.
Set-up a local synchronized folder on my PC/Laptop with CyberDuck
If you wan the contents of the usergroups to be synchronized with a folder on your PC or Laptop. This enables you to access your data when you’re not online. In the free version the synchronization should be started manually. Using the non-free versions enable you to automate the synchronization.
To start the synchronization manually, start CyberDuck, click the File in the top-menu and choose synchronize and follow the wizard.
Archive a folder and its contents as a dataset
Archiving your dataset will be possible in the next release, planned for June 2017.
Adding/Removing metadata to a folder
You can already add some metadata to your dataset, however, this functionality is not yet completed. Adding or removing metadata will be possible in the second release, planned for June 2017.
Change metadata to a folder
You can already change metadata of your dataset, however, this functionality is not yet completed. Adding or removing metadata will be possible in the second release, planned for June 2017.